Linoprinting - with a bit of virtual linoprinting too
Linoprinting 
 The tools needed are here - I don't own expensive tools. I used this cheap cutter with the red handle and various blades. You will also need some printing ink and a roller to apply it. The roller is shown below the cutter in that link.
It's quite possible to produce lino prints without a printing press (although you will get a much nicer print if you own an etching press or book press - you could even experiment with a flower press).

I couldn't reach my inks (which have probably dried out from lack of use) because they are behind a stack of canvasses that I really didn't feel like moving! See new year resolutions about organising and tidying studio < sigh >
I kept the image graphic and stylised, it's loosely based on all those sketches and paintings of Mawgan Porth with the shallow stream winding to the sea and the light catching the wet sand.
Cleaning up can be done with cheap cooking oil - more environmentally friendly - and skin friendly - than turps.

Here I turned the photograph of the printing plate into black and white in the computer - which shows the stylised shapes of the lino plate more clearly - and then added a gradient background.
* the little leather bound book with hand made paper is too nice (and too small for me at 7x5 ins) to use for sketching - so I've decided to make it into a book of small finished works. I'll show you how it goes as I fill it.
So now I need to do a 'proper' print from this and see how it works with printmaking inks.
I know a few of you who read this are experienced printmakers and some do very successful linoprints - if you've got a step-by-step or tutorial on your blog, feel free to leave a link in the comments to help people make sense of my garbled explanations ! :>)
And any tips are welcome too. :>)
and I don't know what George Washington is doing on my cliff! I think I'll have to cut that a bit more and lose that if it shows on the actual plate and not just this computer version - very distracting!

Linoprinting isn't my favourite form of printmaking but I felt like doing something different, something outside my comfort zone.
Lino creates clear sharp graphic images and I am more comfortable with more painterly printmaking methods, particularly collagraphs and etching with aquatint but they do need a printing press and lino doesn't.
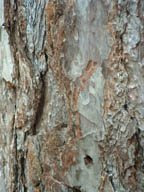
This is the lino itself, I coloured the raised parts with waterproof ink to help me to see how the cut what going - the paler blues and mauves are actually cut away -that's just the remains of some acrylics that I tried that you can see.
This is the lino itself, I coloured the raised parts with waterproof ink to help me to see how the cut what going - the paler blues and mauves are actually cut away -that's just the remains of some acrylics that I tried that you can see.
Printmaking is quite time consuming - there's a lot of 'process' - but once the plate is made, a number of prints can be produced from it. The number depending on the fragility or not of the lino plate .
The idea is that you cut away any area you don't want to print. The areas you leave behind will be inked, usually in one solid colour but it is possible to do very effective gradients of colour with experience.
You can add other colours to the prints with a variety of media or leave it as a clear graphic image. If you produce a series that are all the same then the convention in printmaking is decide on an edition size and then number each one - if the edition size is to be 50 prints and you are printing number 4 it would be labelled 4/50. It isn't of course compulsory but gives buyers an idea of how many you intend to produce and how unique their image is.
If you hand colour parts of it and each one is different they become Monoprints - a unique image with part of it repeated and the rest unique. Monotypes are completely one-offs and unrepeatable.
 The tools needed are here - I don't own expensive tools. I used this cheap cutter with the red handle and various blades. You will also need some printing ink and a roller to apply it. The roller is shown below the cutter in that link.
So, the basic requirements are :
- a piece of lino
- a set of lino cutters
- a roller
- some printing ink
- something to roll the ink out onto - formica/glass/perspex or similar
- paper to print onto - experiment, there are luscious printmaking papers but lots of papers you already have will produce interesting prints
It's quite possible to produce lino prints without a printing press (although you will get a much nicer print if you own an etching press or book press - you could even experiment with a flower press).
You will need something to roll your printing ink out onto, a piece of glass, perspex or formica is ideal, you need a thin film of it which coats the roller lightly, you then roll this across your lino which of course only puts ink onto the parts you haven't cut away. You then carefully lay your paper onto the inked lino plate and putting some strong paper on top to protect your finished work, you rub it firmly, transferring the colour to your paper. You can use your hand or a wooden spoon. If you have a press then you can damp the paper, which maks a better print.

I couldn't reach my inks (which have probably dried out from lack of use) because they are behind a stack of canvasses that I really didn't feel like moving! See new year resolutions about organising and tidying studio < sigh >
I kept the image graphic and stylised, it's loosely based on all those sketches and paintings of Mawgan Porth with the shallow stream winding to the sea and the light catching the wet sand.
I experimented with painting acrylic ink (so NOT designed for printmaking) onto the raised parts of the lino, working fast so that it wouldn't dry too quickly - a beautiful pearlescent lavender/purple - to see if it would print onto some hand made pale beige paper in a lovely leather-bound sketchbook I've just got*. It was half successful - not all of it printed but it came out better than I would have expected - acrylic paint dries too fast and the inks are too thin to coat areas evenly but it left enough colour to make it worthwhile.
The stylised clouds didn't print well and so I worked over them in this version, With proper printing inks everything would be clear and hard edged.
Printmaking inks can be oil or water based. Personally I don't like the water based ones even though cleaning up is easier - they just don't give such a good result. It's possible to start with buying just one colour. I'd go for a Prussian Blue or an Umber. Colour can then be added by hand, making each print unique. Oil based inks need to be left to dry overnight.
Cleaning up can be done with cheap cooking oil - more environmentally friendly - and skin friendly - than turps.
The acrylic ink print gave me an image that I could work into. I used pastel pencils, black biro and gel pen. They all worked pretty well on the hand made paper.

Here I turned the photograph of the printing plate into black and white in the computer - which shows the stylised shapes of the lino plate more clearly - and then added a gradient background.
It is possible with practice to print a background gradient like this with a blank, uncut piece of lino, then overprint when it is dry with your cut plate
.
.
Or you can simply paint the background in watercolour, acrylic - whatever you like - and then overprint.
Remember to reverse your image on the plate.
* the little leather bound book with hand made paper is too nice (and too small for me at 7x5 ins) to use for sketching - so I've decided to make it into a book of small finished works. I'll show you how it goes as I fill it.
So now I need to do a 'proper' print from this and see how it works with printmaking inks.
I know a few of you who read this are experienced printmakers and some do very successful linoprints - if you've got a step-by-step or tutorial on your blog, feel free to leave a link in the comments to help people make sense of my garbled explanations ! :>)
And any tips are welcome too. :>)
and I don't know what George Washington is doing on my cliff! I think I'll have to cut that a bit more and lose that if it shows on the actual plate and not just this computer version - very distracting!


Comments
Thanks for explaining the process, One of my blogging friends in Canada does some beautiful lino printing and just before Christmas she sent me some. I didn't know you could even get the supplies here!...so i might have a go now
I do think when we get a few more of us together, we might even start a moleskin exchange but we are still building our contacts...anyway I hope you have a better year, I know the last one was not so easy...so ll the best for 2209 - ChrissyX
This post is very interesting to me as I treated myself yesterday to a little brayer and some inks and am dying to play a bit. But I need some lino and tools before I can do anything else besides make a mess.
I think the conversations with fellow bloggers are much more in depth and interesting - and none of the snippy comments of some forums either!
ooh that will be interesting Katherine! There is an excellent Encyclopaedia of printmaking in that square books series that would interest you.
Jeanette that will be really interesting to follow :>) Monoprints with oil paints on acetate would be a good way to play with that brayer until your supplies arrive? Acetate allows you to get a decent pressure and it has a nice smooth slidy surface.
Very nice explaination here and I'd only add one hint that helped me with multiple prints. I made sure the basement laundry line was clear and readied with cloths pins. Hanging the prints up to dry insured that my flat surfaces in the studio did not get taken up for 24 hours with drying prints.
Happy new year to you.
I liked the computer image best - then I would wouldn't I??
No resolutions as such but a commitment to myself to take and/or create one image every day.
Took the first one today - hope I keep it up.
Cheers Shirley
Amazing what some people can get with a spoon!
I tried the water-based inks, but hate them! They dry too quickly and often don't roll evenly.I don't even use them for proofing (though schools are sticklers for the wretched stuff!) My advice to others is use good quality oil-based inks and el cheapo cooking oil for cleaning. As you say, kinder to the hands and the airways.
And while lino prints are usually relief method, you can also print intaglio from lino.If you'd like more detail, email me and I'll bore you rigid! ;)
In the photo I didn't see George Washington until you pointed him out.
The link to Jackson's is great. Lino is so expensive in Florence. I paid five euros for a tiny offcut recently. The quality isn't as good as the grey one either.
I was fascinated to see the two little Italian presses on your equipment link. I've never seen those here either! The hunt is on!
I'm really interested in trying other 'inks' too. I've been wondering what would happen if one put retarder into acrylic paint. Or oil paint even. I know real oil based printing ink is superior but it's expensive if one wants to experiment with a large range of colours.
More posts about printmaking would be extremely popular! :)
Hi Shirley :>)
I don't think retarder in acrylic would help much Robyn - the acrylic ink worked ok-ish if you worked FAST - but you couldn't get the solid areas, it was hit and miss whether they printed or not and I think you'd have the same problem
- maybe gouache and then print on wet paper? that might work as the colour is dense enough.... possibly.
Polymetaal in Holland has some of the cheapest etching presses that I've found (suitable for lino, collagraphs and monoprinting as well as etchings and drypoint)
Anita and Robyn - I'd invest in just one colour of oil based inks if I were you - a lot of printmakers use only one colour and either leave it at that or else use watercolour (or anything you like) to add colour - also chine colle. Prussian blue makes rather nice prints or an umber colour or of course black.
Dinah I have had a go at intaglio lino but didn't like my results much - the tutor did some fabulous ones but mine ..... weren't! We used foam in the printing press, is that what you do? I don't have a press and have let my membership of the printworkshop lapse (very expensive and too little time). Why not do a post on it? and I'll put a link here for people to follow.
This is interesting and quite different for me to be absorbed into.
I must say it is fasinating the effects you have created.
I recall has a juior at school being taught a similar technique some 47 years ago (now 56).
This is lovely work
Happy New Year
Trevor
Trevor
I already have invested in quite a few small tubes of coloured oil based printing ink. I too HATE the water based one I started with.
The umber sounds like a great colour, Vivien so maybe I will try to get a small tin of that. I'm hoping to be back in the printmaking studio soon where Rick has an enormous range of beautiful inks.
Now, I too want to know about intaglio on lino. I might go and badger Dinah!
A couple other tips: a japenese brayer is definite a nice easy tool, japanese paper is also a great way to get an easy print. Much thinner so it picks up edges and detail much more easily. I've always printed my linocuts by hand, and dampen paper with a spray if needed. If you like a nice dark solid print sandpaper the surface of the lino lightly before carving. :)
Lino is such a quick easy thing to start. If you're hardpressed, oil paints will do in a jiffy instead of ink.
Thanks again :>)